Locomotives -
Operational Locos -
Locos under overhaul -
Locos on static display -
Locos formerly based on the Bluebell
Loco Roster -
Loco Stock List -
Loco Works News -
Join the Loco Dept
Atlantic Project - Background - Completion and launch - Next Projects: 'Normandy' and the Adams Radial Tank


Bluebell Railway Atlantic Group
2018 progress


March 2018
Fred Bailey supplies an update, with photos illustrating the current state of this project.
First of all I must apologise yet again for the big gap in our updates, but the boiler work is not that photogenic and involves a lot of hard work (for us older folk) with a good deal of grunting and a pot or two of perspiration. However we have not all pushed off to pastures green but have been beavering away on the boiler, plus a few other bits and pieces.
 The overall result is that we are getting quite close to its hydraulic test. That will take place out of doors later on in the year as we have no wish to flood our workshop, which has no pits or drainage. It does not matter how tight the boiler is, everything near will get wet. I hope this little update will be of interest to those of you following and hopefully supporting this project.
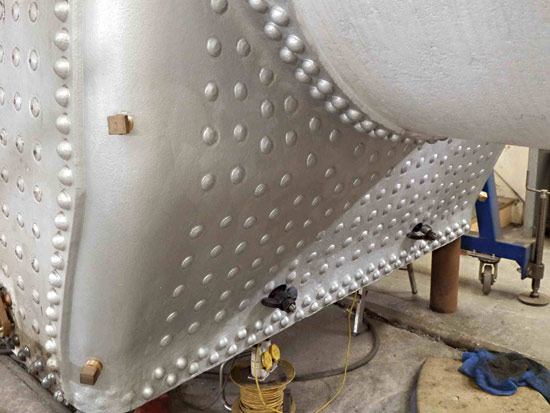
The photo on the right is of the throatplate, now finally riveted to the foundation ring, and with new stays fitted where required in the welded-in patch plate. Also in view are the rather awkward curved mud hole doors with their bridges. All new of course to fit the patch plates.
The first below shows the right hand side of the firebox. The studs that hold the blowdown valve still need to be fitted, and of course so will the valve itself. This is finished and in stock.
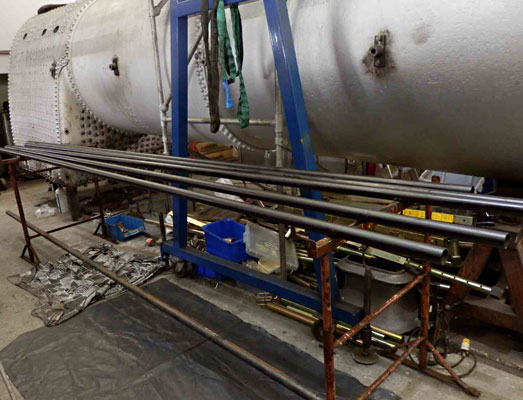
All the small tubes and the superheater flues have received 2 coats of a graphite-rich coating prior to fitting as mentioned in my last update, but it is quite a time consuming (and not to mention messy) job, but hopefully it will be worth it in due course. A quick calculation shows that we have covered roughly 1/10th of an acre with graphite paint!
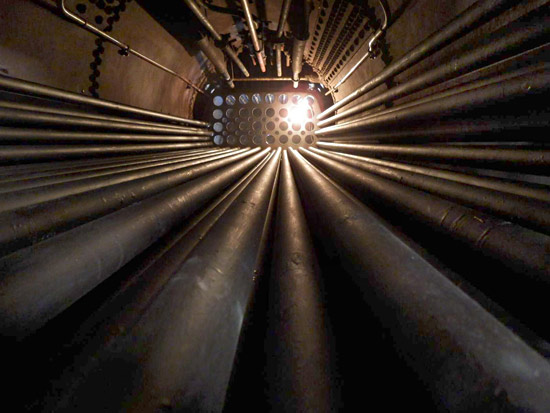

The picture on the left was taken through one of the superheater flue holes, looking towards the firebox, and shows all of the small tubes in place with the exception of those that are in amongst the flue tubes. As the top of our tender chassis which sits in front of the boiler is higher than most of the small tube holes, each one had to be inserted higher up than needed, then threaded through a lower hole at the firebox end, prior to shuffling to and fro before arriving in its final place.
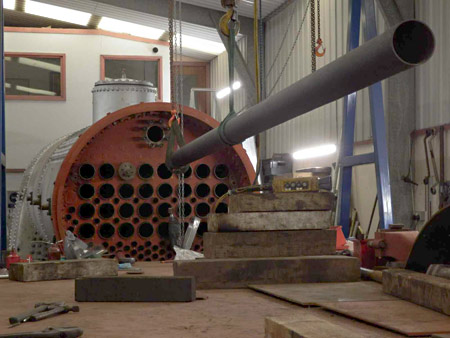
The flues weighing in the order of 1.5 cwt (76 kg) needed to be handled semi-mechanically, and below is the last one about to be put in to the boiler - a red letter day for us, but only the start of another process - expanding! One might be able to make out a tool filling up one of the tube holes and this is an expanding toothed collet that grips the inside of the tube and allows one to turn the tube to screw it into the thread in the copper at the firebox end.
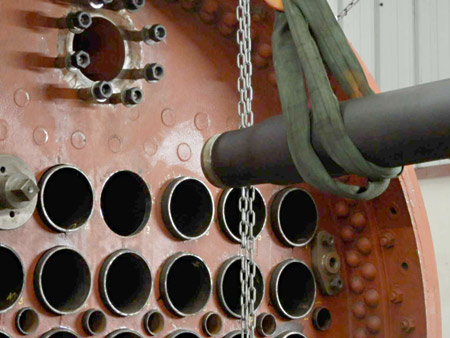
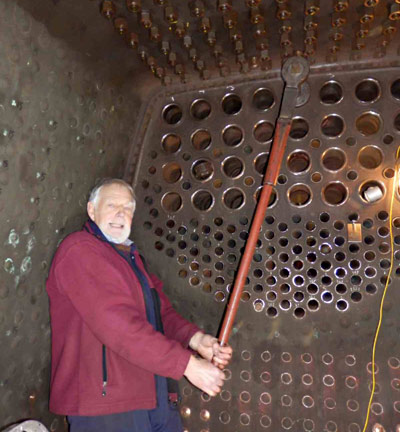
On the right, a volunteer member of the "Old mans' gang" that makes up our build team getting value for money out of his membership of the gymnasium that is The Bluebell Railway - about £20 per year for Senior Citizens at the 5 year rate. Just think what proper gym membership must cost - all that exercise to get aching muscles for no result! Here we have another flue expanded, so a few aches, but with a positive worthwhile result!
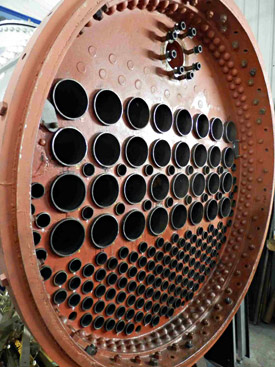
I will not go through the rest of the tubing in detail, but suffice to say, below is the front tubeplate with all the flues and tubes expanded. Unfortunately further very skilled processes need to be applied to the tube ends, especially in the firebox, but these will be carried out after a pressure test. If done beforehand and a leak is found on test it makes a further expansion of the offending tube almost impossible.
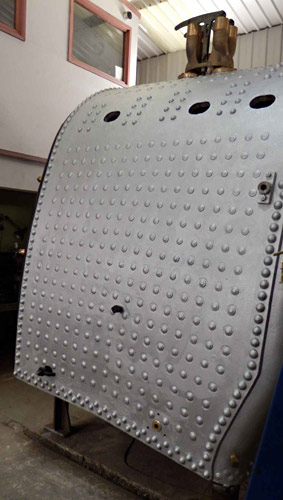
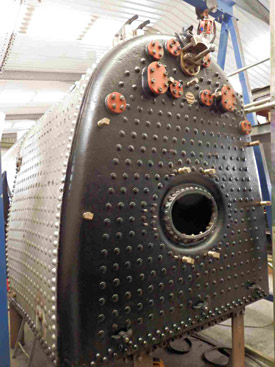
The next view below shows the backhead with most of the blanking plates and the regulator rod and its gland installed ready for testing. Unfortunately we are still waiting for the special frame for our new small hydraulic riveter to be made by one of our local sub-contractors. As usual, you find a company that produces good work, who then become known and busier and then their deliveries start to slip. The space available around the door ring (which needs riveting) is rather too limited to use two pneumatic riveting guns, a squeezer is more compact, not to say quieter.
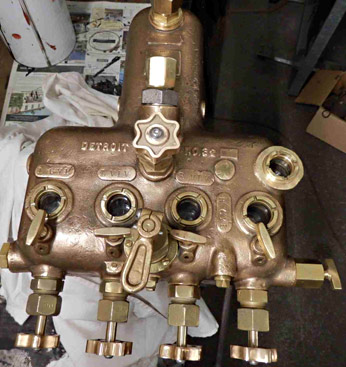
Concurrently with all the boiler work, one of our regular volunteers has completely stripped and rebuilt a four-feed Detroit sight-feed lubricator. This has needed a lot of new parts, some made by him, some purchased and others made by our volunteer turner. This is the advantage of having a small but good team who all work together. On this fact a lot depends. It is hard enough tackling these projects without having "people" problems. They are the most destructive of all. The main thing is although a serious project it must also be fun!
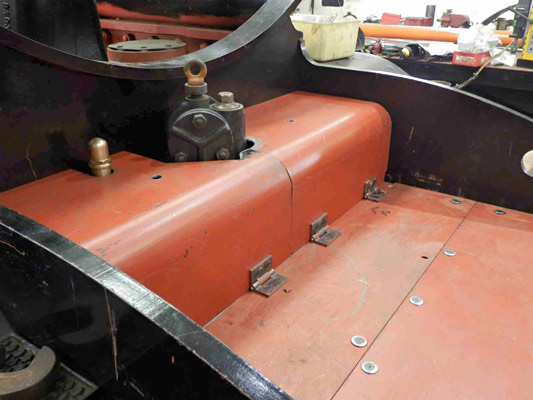

This is all one can see of the Westinghouse pump and its new governor, now the front footplating is in place and the pump covers installed!
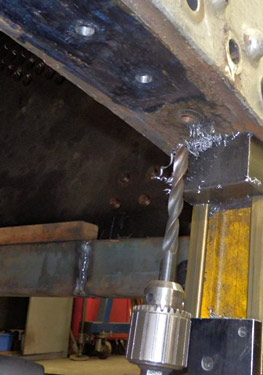
Another job we could not put off any longer was drilling and tapping new holes for the front boiler support and for the centre grate support and also the drilling and burning out of old original studs that held the rear side expansion brackets and the ashpan. All of this work entailed working upside down under the boiler's foundation ring. (We do not have facilities in Atlantic House to turn boilers over). In the first photo below one can see the pilot holes that have been drilled with our small magnetic based drill.
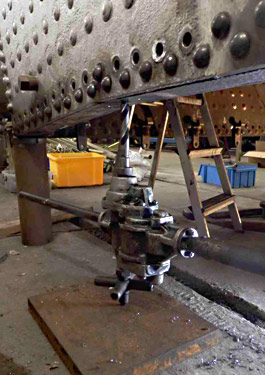
These holes needed to be opened out to a size larger than the capacity of the smaller drill, so we used our air drill, as seen in the middle photo below. With limited room between the floor and the foundation ring some drills had to be considerably cut back and reground, but tools such as these have to be expendable up to a point - pun not intended! Even after all of this the remains of the studs needed further attention from the oxy-acetylene to get the last remnants out.
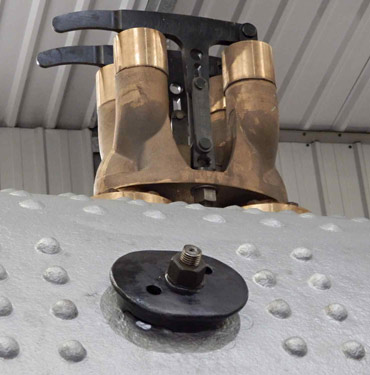
My last picture shows the safety valves bolted down on to the boiler. (They are shown with the gagging links fitted to allow for a hydraulic test to a pressure beyond its working steam pressure). These links are replaced with the final safety links after the hydraulic test. Also in view is one of the upper inspection doors with its cover / clamp plate. These door cover plates are about flush with the clothing sheets so are not too conspicuous. Only boilers for the C1's built after about 1936 had these doors. Prior to that and in common with the Brighton engines the boilers had plugs in these positions. The later doors are tricky to fit, but provide excellent access for inspecting the firebox crown and all of the crown stays etc.
May 2018
As work on the boiler continues, fabrication of its clothing is the main preoccupation of this report from Fred Bailey.
As no doubt you have seen in previous updates, we are reasonably comfortable with the machining of components, and the fabrication of heavy lumps of metal, but when it comes to the thinner sheet metal required for the details related to the boiler clothing sheets, then we are into a specialist area.
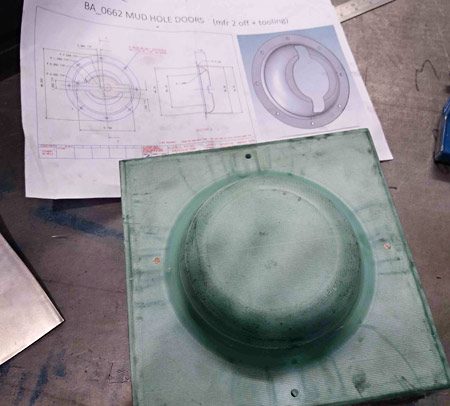
I have spent quite some time trying to find a company to make such items as the decorative mud hole door surrounds, the mouldings that fit to the boiler clothing but cover in the front corners of the firebox, plus that which encircles the backhead. Also we need a proper outer dome cover and some other parts that will not be seen (very unfortunately), these being the pockets that are inside the boiler clothing where the latter is cut away to clear the tops of the driving wheel splashers. Also we needed that company to have the capacity and capability to do this work at a sensible price. This work is far from being mass produced body panels and involves a mix of pressing onto simple tooling followed by skilled handwork for final forming and finishing.
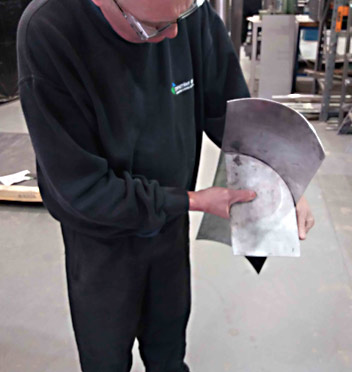
The company now doing this work for us were very keen to put this through their apprentice school as it provided an ideal opportunity to learn the hand crafts on components with a function and use, not just an exercise. Just this last week two of the apprentices involved in this work together with their Training School Manager and Welding Supervisor visited us in Atlantic House and delivered the first components. To say I was impressed is an understatement!
 The company to whom I refer is The Premier Group in Coventry. A number of the photographs that follow were taken by Mr. S. Burdett of that company and I will acknowledge his photographs accordingly. Note to other locomotive projects: please do not inundate them with work until ours is finished!
I am going to start with a few pictures showing part of the manufacturing process.
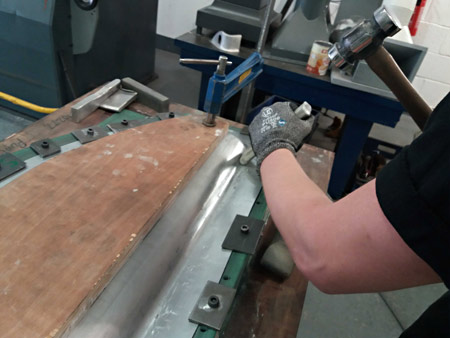
Right: The first stage is to make male and female plastic tooling and then form the dished portion with a rubber press. (S. Burdett, The Premier Group)
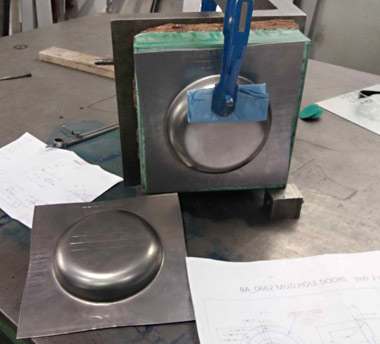
Below: After this the dish is clamped to the tool on an angle plate for the marking out of the shaped holes that pierce the component to allow the bridge on the mudhole door on the boiler to protrude. These doors have to be able to be removed without taking this surround off of the clothing sheet. From this point all of the work is down to manual dexterity. (S. Burdett, The Premier Group)
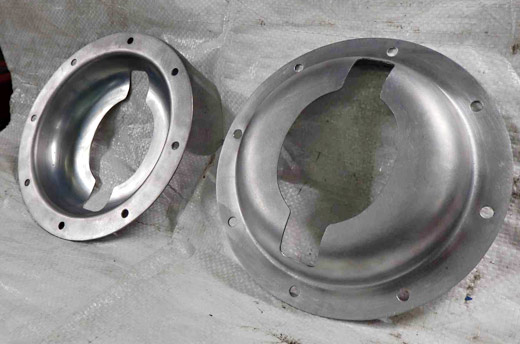
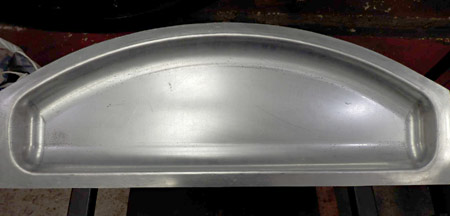
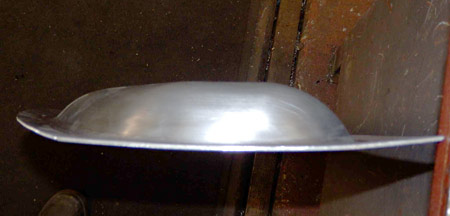
Next are the two finished articles, one seen from the inside, the other the outside. (Fred B.)
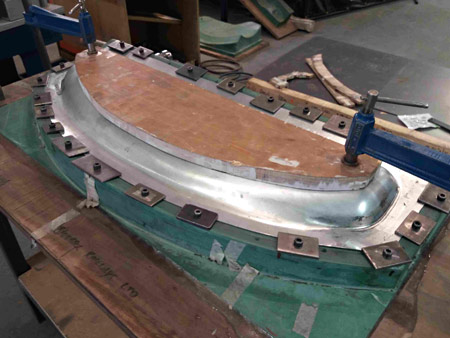
Below is one of the pockets to take the splashers, after pressing using the male and female tooling, but now mounted on the male tool and robustly clamped down with a solid backing piece to prevent distortion ready for the corner radius to be hand chased.
Next we have that corner being hand chased by one of the apprentices. (Both: S. Burdett, The Premier Group)
Now, looking into the pocket itself on the finished article. We will be drilling the fixing holes in this part once we have the clothing sheets properly located. But that is some way off as yet!
They are very difficult to photograph, but as these pockets fit to the boiler clothing, the whole item is curved, the pocket as well as the flange around it, to let it match both the boiler itself as well as the clothing sheet, although not touching the boiler itself. (Both: Fred B.)
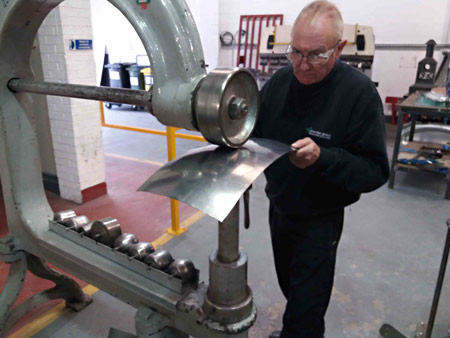 Here we have the start of one of the firebox mouldings, being formed on the English wheel. This is a real black art and I think something that can only be learned by practice, practice, practice. By pushing and pulling the sheet metal between the two rollers, one above and one below the sheet and with some pressure between them the metal is slowly stretched on one side more than the other so making it deform into a curved shape. The art then comes in knowing in which direction one rolls the sheet to increase or decrease the curvature in the direction required. The whole shape is then matched to sheet metal templates. I may well detail this more in a later update. (Right and below: S. Burdett, The Premier Group)
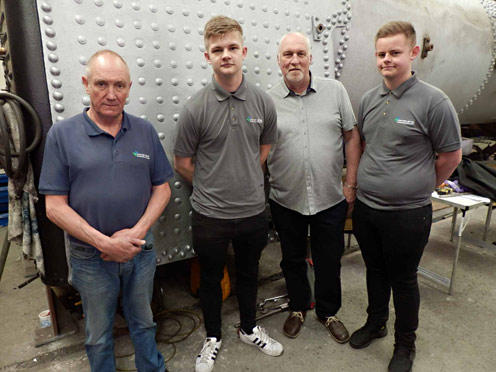
The second photo below shows our visitors from The Premier Group. Left to right: John Watkins, the Training School Manager (also seen on the English Wheel), Lewis Prewett, Sheet Metal Apprentice, Gary Horton, Welding Supervisor, and Toby Casey, Sheet Metal Apprentice. (Fred B.)
Moving on to my more normal topics, the boiler is now fully riveted and we have done some preliminary low pressure air tests to look for obvious leakage.
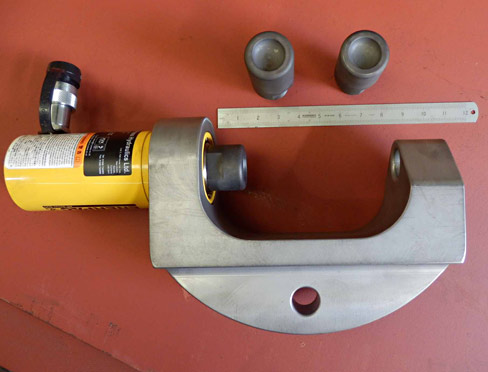
We designed and had built a mini hydraulic squeeze riveter specifically to put in the rivets around the fire-hole door. There is insufficient room to manouvre a pneumatic rivet gun so this was our answer. Although I did some simple FEA on the 3D model of this item, with a 25 ton ram applying the squeeze onto a very hot rivet I wanted to make sure it was up to the job, so did some tests to check on the deflections especially at full load. Fortunately they were very similar to the results from the model.
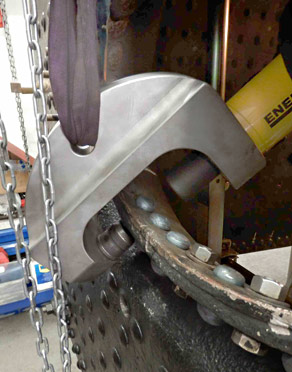
Below is the riveter in position having just put in another rivet. Keith was adjusting the riveter's position inside the boiler and once all set I was heating the rivet, putting it in the hole for Keith to grab and hold with another pair of tongs whilst I got the underside snap in the riveter onto the rivet head. Once there he could dispose of his tongs and guide the upper snap onto the rivet. I meanwhile had my head next to the riveter frame and my foot on the valve operating the ram. All done as quick as possible. I hope you will forgive me for not getting an "action" photo! This also explains my deflection test!
Below we see all of the rivets in position. In addition to the heads one can see the plates were heavily countersunk on both sides (as made by the LNER).
Finally for this update, Keith looking for leaks with a flare - we have progressed from having our hats blown off, as you can see. Our old compressor has worked overtime at this, but about 10 psi or so can tell one a lot, and now we are using soapy water so that the bubbles show up the lesser leaks. The superheater flues are as yet only expanded and not belled or beaded. We will do this after the hydraulic test. No doubt on a full hydraulic we will find more leaks, but this method is a lot drier and certainly finds the worst of the problems early on.
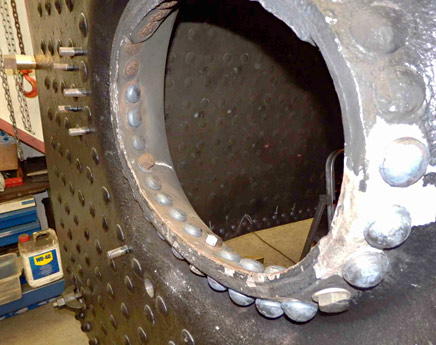
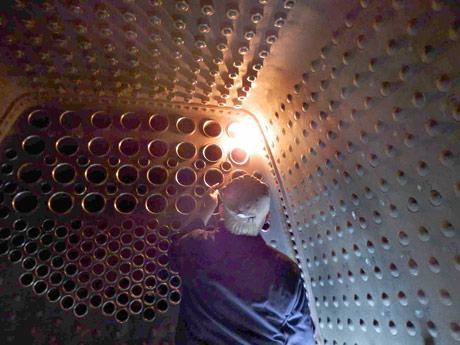
We have also made up temporary low height "track" ready to wheel the tender chassis and the boiler outside, but due to our position in the yard and the other projects taking place around us we are likely to meet with some delay in moving the tender chassis and boiler. There are always jobs we can work on however and they all move the project forward.
September 2018
The boiler has moved out of the shed, and work restarted on the tender, as reported here by Fred Bailey.
The component sponsorship list has also been updated.
We have recently moved the boiler outside of Atlantic House for the final work to be carried out in preparation for its hydraulic pressure test. Due to lifting and space restrictions within Atlantic House we are likely to virtually finish work on the boiler while it is outside in its present position.
At present on order from outside contractors are the rolled plates for the smokebox and also all of the folded and flat parts required to make up the ashpan. The space within our workshop made available by the boiler's exit will enable work on these two items to be continued inside.
Meanwhile given reasonable weather we are now also working on the crinolines which will eventually support the boiler clothing sheets. Our present plan is to assemble these parts together with the smokebox and ashpan to the boiler. Then with the clothing sheets temporarily removed, the final hydraulic test can be completed prior to the reinstatement of the clothing followed by its installation in the chassis, again using a mobile crane. Finishing work can then be done in Atlantic House without impinging on the space in the main works that is better utilised for repair and overhaul of existing locomotives.
At present work is progressing on the piping up of the tender chassis, prior to the fitting of the tank and coal space. Final drawings for these components are well in hand and we hope to get the whole basic welded assembly made by outside contract, ready for us to apply the more tricky riveted details on it being delivered to us. Obviously none of this is written in tablets of stone and is subject to changes depending on circumstances.
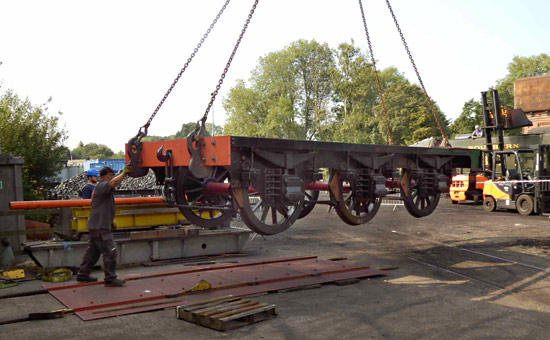 To allow us room to get the boiler out from Atlantic House, since the tender chassis was in front of the boiler in the shed it had to be wheeled out onto our temporary extension track and lifted clear, as seen in the photo to the right. It was then temporarily placed on the siding in front of the shed.
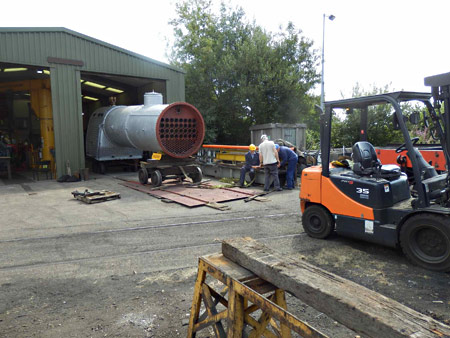
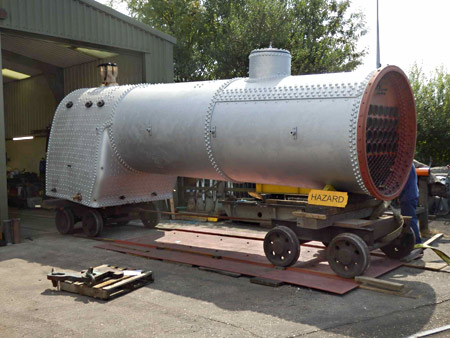
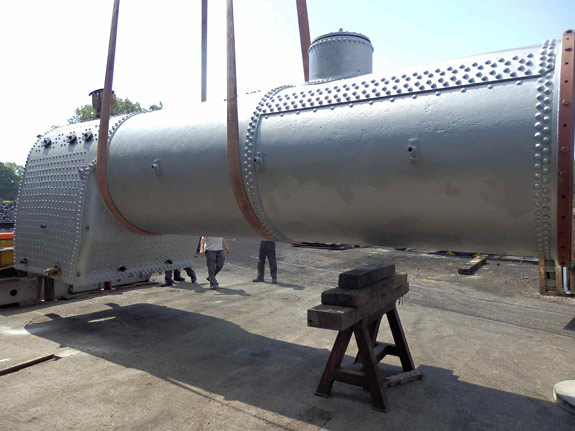
The first photo below shows our boiler half way out of the shed, while mounted temporarily on the boiler trolleys. This whole job took place on what was probably the hottest day of the year, and the steel parts of the temporary track was actually too hot to pick up bare handed.
This is the first time the boiler has been outside since about 2006. All holes are blanked off and the safety valves fitted but gagged in readiness for its hydraulic test. A small amount of work still needs doing to seal some odd leaks prior to a hydraulic test.
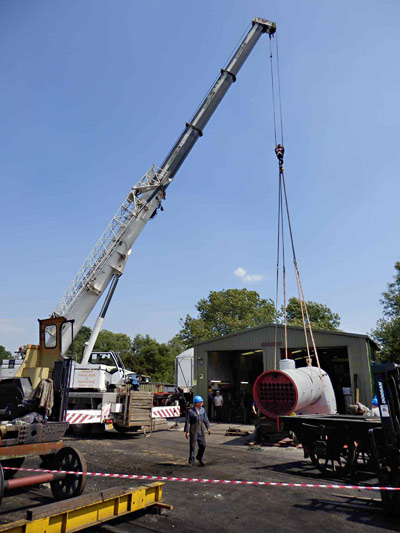

Here we see the mobile crane lifting the boiler in preparation for putting it on the ground in a temporary location. This was necessary so that the tender could be returned to the shed, to allow us to carry on working on it.
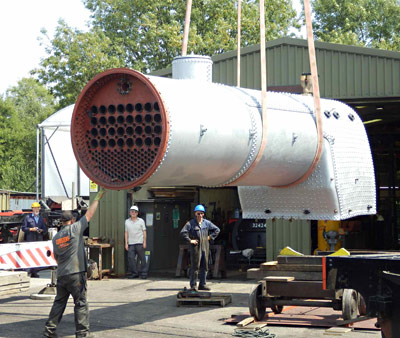
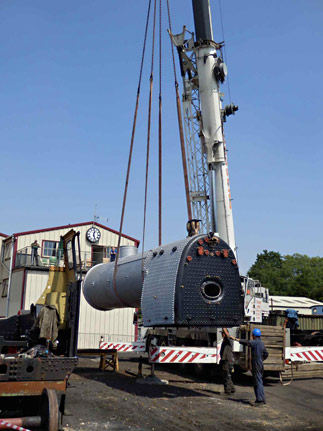
Next we can see a view showing the backhead of the boiler, as it is lowered temporarily, and then lastly we see the boiler in the process of being placed in its final position outside Atlantic House.
I am working on the drawings at present for the tender tank, which we may well order from a company that can produce the whole basic tank for delivery in one piece for final finishing back in Atlantic House. So, moving on to the work starting on the tender, our first job has been to lift it off of its wheels so that the axles can be ultrasonically crack detected. This was not done earlier as we would have lost say 10 years off of the ultrasonic test ticket once it was completed.
To lift the tender chassis from its wheels, we used the lifting frames that we had previously used for the engine as these provide a slow, safe controllable method of lifting such items. It is also very good when it comes to lowering the chassis back on to its wheels. We will also be fitting the final dust shields and lubrication pads at this time. While up in the air we may well make a start on piping up the tender for the air brakes, vacuum pipes, steam heat pipes and of course in due course the injector water feeds.
The next photos below from F. Wijenbergh show the lifting frames raising the chassis, and then a similar view, but now with the axleboxes removed and bearing crowns taken out, so allowing access to the axle ends.
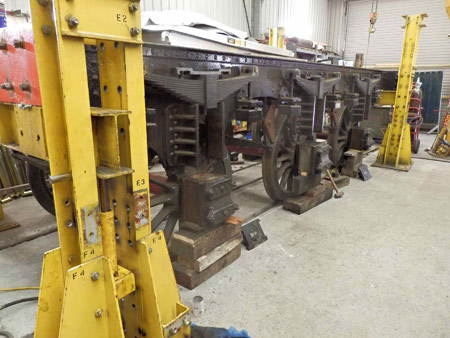
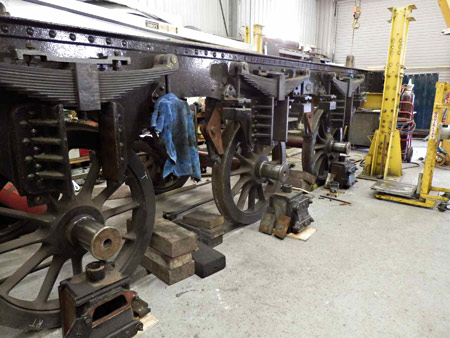
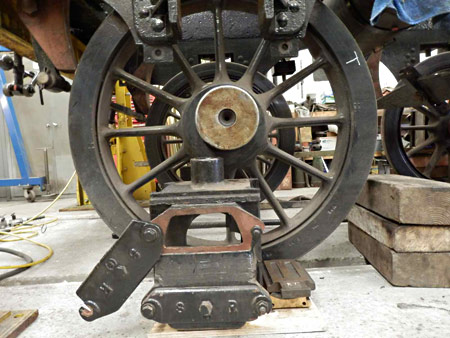
The third of his photos, below, shows a view of the tender axlebox once removed from the axle with the two access covers swung open. The top one allows withdrawal of the crown bearing and the bottom one to gain access to the Armstrong oiler that wipes oil onto the axle from the underside. On the ground to the right is the bronze bearing crown (upside down) and the keep plate that fits above the crown.

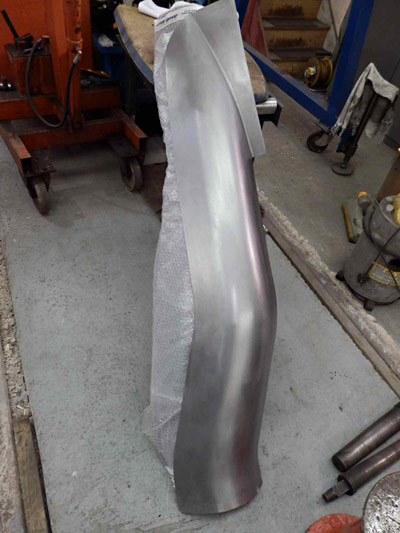
The final photo, to the right, by S. Burdett of the Premier Group, shows one of the firebox throatplate corner boiler clothing sheets. Again an excellent job done by one of the apprentices in the apprentice training school run by The Premier Group in Coventry.
|
|


More recent news updates
Older news updates
- Background and early progress
- September 2001: Repairs to tender chassis.
- More photos of the project (1999-2002).
- March 2002: Modification of front end of tender.
- November 2004: Loco Frames ordered.
- December 2004: Bogie frame components arrive - also Feb.2005 news report.
- 2005 - Loco main frames arrive - tender frames nearly completed - start of construction of the shed.
- 2006 - Loco driving wheel castings delivered - drilling of the main frames and hornguides - building of the shed completed.
- 2007 - Main locomotive frames erected.
- 2008 - Components for the cylinders and valve chest delivered - frames riveted - forged billets for connecting and coupling rods delivered.
- 2009 - First motion parts water-jet cut from forged blanks - bogie frames assembled.
- 2010 - Cylinders and valve chests fabricated, air brake cylinders completed, bogie and trailing wheelsets completed.
- 2011 - Coupling rods and axleboxes delivered, reverser mechanism completed, crossheads cast.
- 2012 - Valve and cylinder liners fitted - lifting and reversing arms and axlebox crowns delivered - castings for mudhole doors, regulator and whistle valves, reversing shaft clutch, blast-pipe cap, crosshead slippers, 'J' pipe and eight eccentric halves received - Bogie and trailing axle now support the frames - Valve chest and cylinders fitted to frames, covers fitted, and pressure tested.
- 2013 - Cylinders, valves, slidebars and crossheads completed - driving wheels completed - valve gear components delivered - lifting frames constructed.
- 2014 - Weigh (reversing) shaft and air-clutch fitted, axleboxes metalled, machined and fitted, wheel rotators constructed, eccentric rods, valve and reversing gear, pipework for brakes and steam heat completed, locomotive wheeled, cylinders clad and crossheads fitted.
- 2015 - Rolling Chassis completed with all motion erected. Running plates and splashers completed, along with cab sides and front.
- 2016 - Connecting and coupling rods fitted, valves set. Superheater header delivered. Revision of boiler internal pipework completed. Cab roof riveted together and fitted. Mud-hole patches welded into boiler. Flue tubes (with screw ends welded on) delivered.
- 2017 - Major progress on the boiler overhaul, and with the safety valves.
Project Funding
A fund raising appeal for the cash required to complete the project was launched in 2000, and a combination of gifts made via the Bluebell Railway Trust, and standing orders set up to provide a steady income to the project have now made over a third of the total available. Whilst this has provided funding for the present work, more is going to be needed to complete the project, and the best way in which you can help is by setting up a small, regular, standing order to the Bluebell Railway Trust under Gift Aid, since this enables the Trust to reclaim the basic rate tax you have paid, and (if you are a higher rate tax-payer) enables you to reclaim some tax as well.


Return to BRPS Home Page,
to the Timetable or to Special
Events
Atlantic Project - Background - Completion and launch - Next Projects: 'Normandy' and the Adams Radial Tank
Visitor Info. -
Museum -
Trust -
Catering -
Contacts -
What's New -
Projects -
Locos -
Carriages & Wagons -
Signals -
History -
Other -
Links -
Search -
FAQ
Why not become a BRPS Member? -
Get more involved as a Volunteer
Your ideal Film/TV location?
 Photos and reports from Fred Bailey.
Page maintained by Richard Salmon
© Copyright BRPS. Privacy Policy
|
